Creating Technical Attributes Template
To create / add a new Technical Attributes template, click the add button. The new template screen is displayed as shown below:
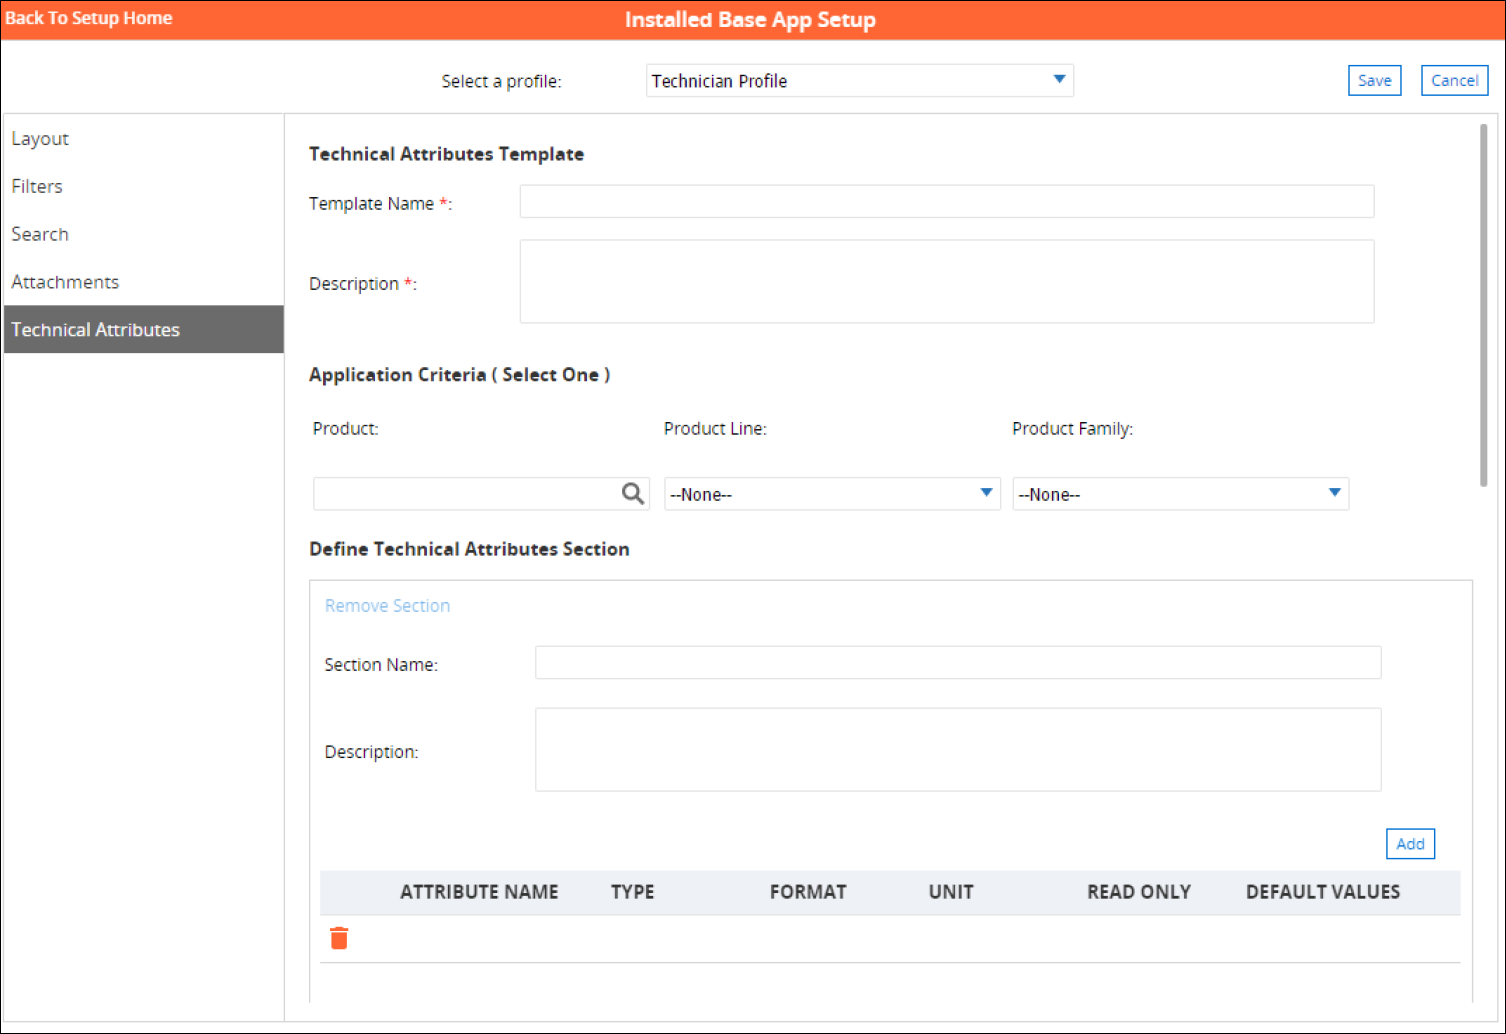
It comprises the following sections:
Technical Attributes Template
This section captures the basic details of the template. Both the fields in this section are required fields.
• Template Name: Enter a short and unique name for the template
• Description: Enter a brief description to help identify the purpose of the template

Application Criteria
Application Criteria section defines the association between the template and specific product(s), with the applicable product(s) identified by Product, Product Line, or Product Family. Based on this association, the relevant template is displayed in the mobile app. Since it is possible that up to three templates can be returned for an installed product in the app, the template defined for the Product takes priority over the templates defined for Product Line and Family. Similarly, the template defined for Product Line takes priority over the one defined for Product Family
To associate the template, choose any one of the following steps:
1. In the Product lookup field, click the search button. The Product lookup screen is displayed with a list of available products. Click on any product to add to the acceptance criteria. Additionally, you can also search for specific product by entering its name and clicking Go. OR
2. In the Product Line drop-down list, select the required product line. OR
3. In the Product Family drop-down list, select the required product family.

If a template already exists for the Application Criteria chosen, the following error message is displayed. This basically means that there can be at most only one template each for a given Product, Product line, or Product Family.

Define Technical Attributes Section
The Define Technical Attributes section allows you to group similar or related attributes and shows the list of attributes adjacent to each other in the mobile app. This categorization is useful when there are many technical attributes for an installed product and grouping similarly related attributes makes it easier to locate them.
A template is saved only when there is at least one section with a minimum of one attribute defined.
The following fields are shown in this section:
|
Field
|
Description
|
||
|---|---|---|---|
|
Section Name
|
Enter a short and unique name for the Technical Attributes section.
|
||
|
Description
|
Enter a brief description detailing the purpose of the various attributes defined under it or their logical grouping.
|
||
|
Attribute Name
|
The attribute name that identifies the attribute.
|
||
|
Type
|
The type of attribute.
|
||
|
Unit
|
The unit for the attribute. In order to be able to support a wide variety of possible units and metric systems, it defined as a textbox instead of a drop-down list.
|
||
|
Format
|
The format for the attribute. The following are the list of values:
• Number
• Text
• Boolean
• Picklist
|
||
|
Mandatory
|
Assign critical attribute fields as a mandatory field in the template.
|
||
|
Read Only
|
Select Yes if you want to disable the editing of the attribute value. is set to ‘Yes’
|
||
|
Default Values
|
Enter the default value for the attribute if required.
|
||
|
Minimum Value
|
Define the minimum value for a numeric attribute in the template.
|
||
|
Maximum Value
|
Define the maximum value for a numeric attribute in the template.
|
||
|
Message
|
Define user message for the threshold values.
|
Adding and Removing Sections
You can add more sections to create more categories of attributes. You can do so by clicking the Add Section link located at the bottom in the Define Technical Attributes Section.

Similarly, you can also delete sections by clicking the Remove Section link located at the top within the Define Technical Attributes Section. When a section is removed from the template, all attributes defined under it are also deleted.

Adding Attributes
To define attributes under a Technical Attributes Section, follow the steps below. The Attribute Name, Type, and Format are mandatory fields.
1. Click the add button in the Define Technical Attributes Section.
The following fields are shown in this section:
Field | Description | ||
|---|---|---|---|
Section Name | Enter a short and unique name for the Technical Attributes section. | ||
Description | Enter a brief description detailing the purpose of the various attributes defined under it or their logical grouping. | ||
Attribute Name | The attribute name that identifies the attribute. | ||
Type | The type of attribute. | ||
Unit | The unit for the attribute. In order to be able to support a wide variety of possible units and metric systems, it defined as a textbox instead of a drop-down list. | ||
Format | The format for the attribute. The following are the list of values: • Number • Text • Boolean • Picklist | ||
Mandatory | You can assign critical attributes fields as a mandatory fields in the template.
| ||
Read Only | You can select Yes if you want to disable the editing of the attribute value. is set to ‘Yes’ | ||
Default Values | Enter the default value for the attribute if required. | ||
Minimum Value | The minimum value range for an attribute in the template. | ||
Maximum Value | The maximum value range for an attribute in the template. | ||
Message | Define a message for the attribute. |
2. Click Save to save the Technical Attribute along with the attribute definition.
Configuring Picklists
Selecting Picklist from the Format drop-down list for an attribute provides you with an option to create a new picklist, configure picklist values, and associate the picklist as the default value.
You can create more than one picklist. An attribute can only have one picklist associated to it. However, a picklist can be associated with multiple attributes.
Creating a Picklist
To create a new picklist and associate the picklist to an attribute, follow the below steps:
1. In the Format drop-down list, select Picklist.
2. In Default Values for the attribute, click the Select link. A Picklist Selection modal window is displayed.
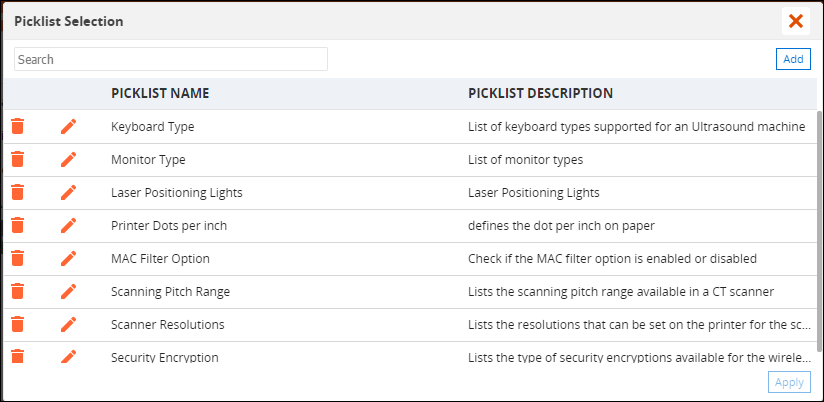
3. In the Picklist Selection window, click Add to add a picklist. A Picklist Selection window is displayed.

4. In the Picklist Definition window, enter the following details:
Fields | Description |
|---|---|
Picklist Name | Enter a name for the picklist |
Picklist Description | Enter a brief description to help identify the purpose of this picklist |
Picklist Values | Enter the picklist values, each separated by a new line |
Use first value as a default value | Select this checkbox if you want the first value to be considered as the default picklist value. |
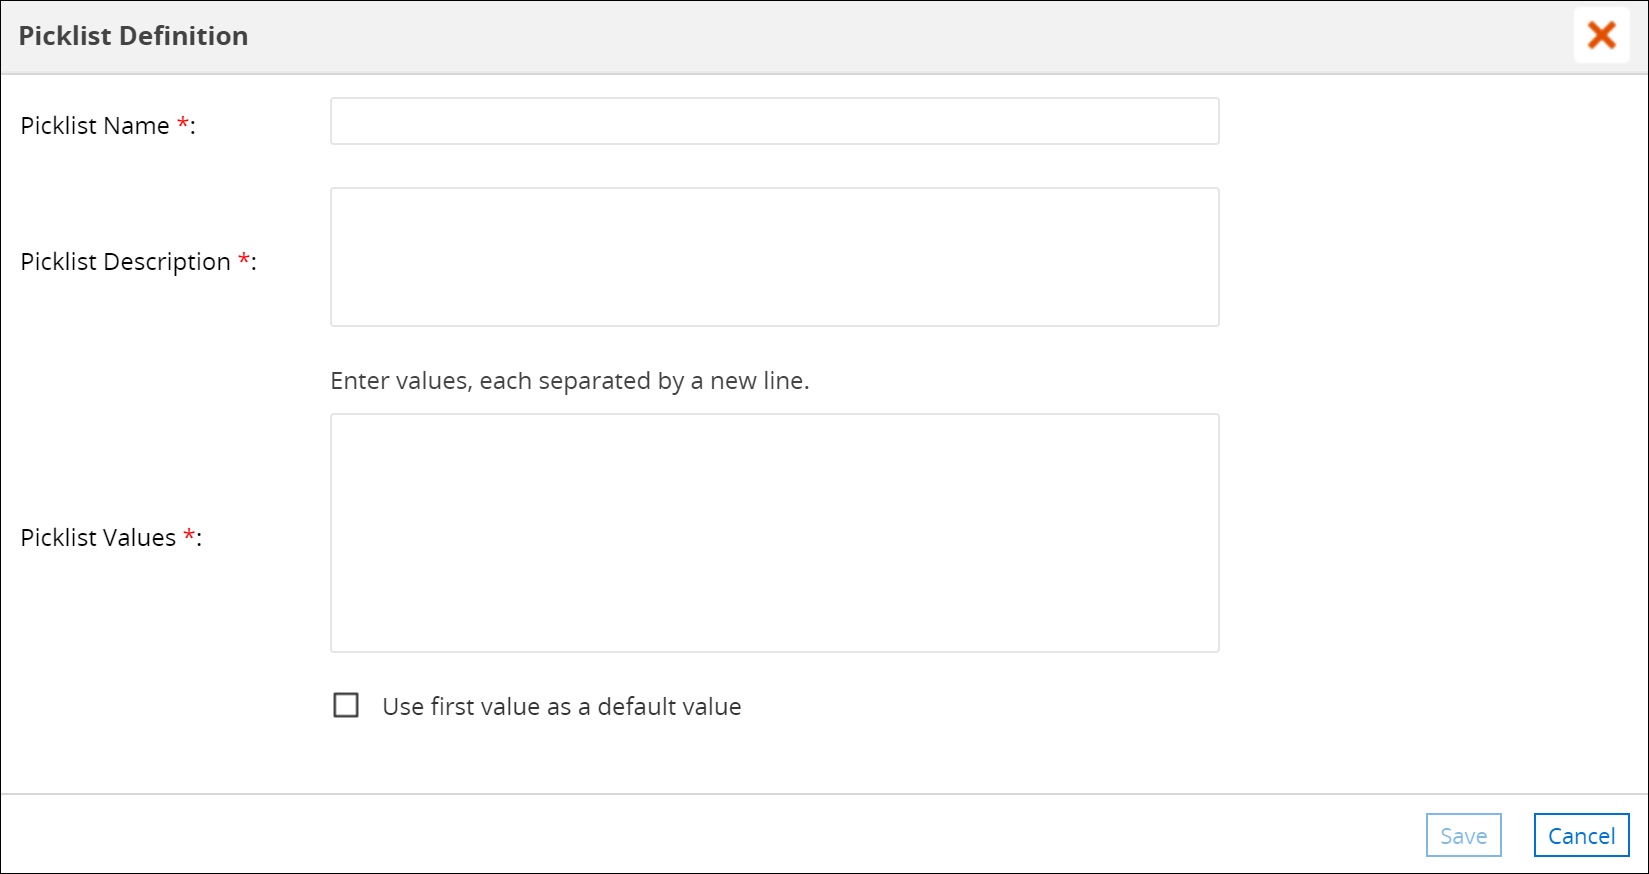
5. Click Save to save the picklist definition.
6. In the Picklist Selection window, click and select the desired picklist. The selected picklist is highlighted in an ochre background.
7. Click Apply to set the selected picklist as the default value for the attribute. The selected picklist name is displayed as the default value in the Default Values column.
Editing a Picklist
To edit a picklist:
1. Go to Define Technical Attributes section
2. Select the attribute and go to Default Values column
3. Click picklist name link. The Picklist Selection window is displayed.
4. Click the edit icon next to the picklist you choose to edit.
5. Edit the picklist details form the Picklist Definition window as displayed in the following screenshot and click Save.
6. Edit Picklist

The updates to picklist values on existing templates is updated in the client application after the next data sync. Click the checkbox Use first value as a default value and click Apply from the Picklist Selection windows to set the selected picklist as the default value for the attribute. Picklist fetches the last updated picklist values from the Picklist Definition.
When picklist is added to the Technical Attributes Template of an Installed product through an attribute request payload using the REST endpoint URI, then you will not be able to edit that picklist and its value unless the picklist values are also added as a part of the attribute payload.
Searching for a Picklist
The Picklist Selection window displays all the picklists available. This window can be accessed by clicking the Select link in the Default Values column of the attribute or by clicking the name of picklist link that is already associated to the attribute.
You can use the search box in the Picklist Selection window to look for a specific picklist. It is a case-insensitive search that looks for the entered keyword anywhere in the picklist name and picklist description, and displays the matching picklist.
Deleting a Picklist
You can delete a picklist by following the steps below:
1. In Default Values column for an attribute, click on the picklist name link. The Picklist Selection window is displayed.
2. Click the delete icon next to the picklist you want to delete.
3. In the Confirm Delete dialog box, click Confirm to confirm deletion of the picklist.
4. Click the close button to close the Picklist Selection window.
Deleting a picklist that is already associated as an attribute value in a template, will not impact the existing attribute value.
Editing and Deleting Attributes
You can edit attributes defined in a template by clicking in the required field of the attribute and making the changes. Click Save to save the changes.
Similarly, you can delete any attributes defined in a template by clicking the delete button adjacent to the attribute name. Click Save to save the changes.
You must perform data sync on the mobile app to download the changes made to the template. However, any changes made to a Technical Attributes Template will be in effect only from its next new instance. In other words, for the installed products where technical attributes values already exist, the changes will not be reflected. They will be applied only for the installed products where technical attributes are being recorded for the first time.